This tutorial will demonstrate a method of scewing and flipping images using the Kinetic Javascript Library for the HTML5 Canvas tool.
This tutorial is intended for people at least somewhat familiar with Javascript and HTML5 Canvas.
It uses the Kinetic Javascript Library, created by Eric Drowell, available at: https://kineticjs.com/. The library is also included in the downloads below.
What does scewing an image mean?
While creating this tutorial I learned that scewing has at least 20 different definitions, however the definition we will be talking about is the one invented by image processing programs.
It means distorting a rectangular 2D image in a way that the image is no longer rectangular, but no cropping occurs.
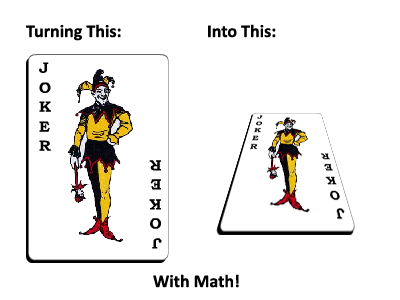
This can be used to create the illusion that an image if falling over or flipping over, allows you add an illusion of depth to your web content.
Here is a little demo site I created to show my code in action.
It has a number of controls you can tweak to demonstrate what this code can do for you.
- You can insert you own URLs for the ‘from’ and ‘to’ images and change their size.
- You can set it to any scew amount between -1 and 1. Scew values lower than -1 and greater than 1, will flip around to the ‘back’ of the image.
- The checkbox swaps between vertical and horizontal slices and the animation button plays a full flip animation.
- The circle at the top left can be used to move the animated object around the canvas.
This is achieved using only HTML5 Canvas and KineticJS, it will work in any browser that supports HTML5 Canvas, including most smartphones.
The scewing works by creating a large number of strips, each strip is filled with a sample from the original image and then scaled and placed in such a way that the image gradually distorts and seems to flip.
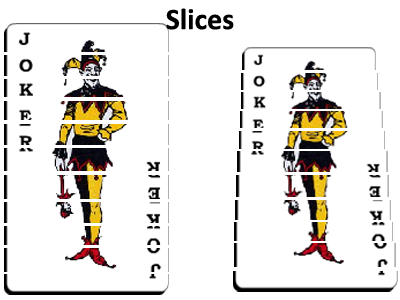
By using more slices you get a smoother and more natural looking scew. But the more slices you use, the more you will need to sample and draw.
The math is in the calculations for the adjusted size and position of each slice and what part of the original image it should sample from.
The scripts
The first thing we need for a scewed image on a HTML5 canvas is the HTML5 canvas. So we begin with a bit of Javascript to set up a canvas.
// create a kinetic Stage, this is a wrapper for the HTML5 canvas object. var stage = new Kinetic.Stage( { container: 'container', width: 400, height: 300 }); var layer = new Kinetic.Layer(); // create groups for movement and animation. var scewedImageLocationGroup = new Kinetic.Group( { x: 10, y: 10, draggable: true }); var draggableClickArea = new Kinetic.Circle( { x: -3, y: -3, radius: 6, fill: 'gray', stroke: 'black', strokeWidth: 2 }); var scewedImageGroup = new Kinetic.Group( { x: 0, y: 0 }); scewedImageLocationGroup.add(scewedImageGroup); // Some variables to load the from and to urls into, as well as the current image var currentImage; // nothing yet. var imageFrom = new Image(); var imageTo = new Image(); var stretchToWidth = 143; var stretchToHeight = 209; // once everything is initialised it can be added to the stage. layer.add( scewedImageLocationGroup ); scewedImageLocationGroup.add(draggableClickArea); stage.add(layer); |
This also initializes 2 instances of the class Kinetic.Group, a KineticJS Group is like <div> for HTML5 canvas. They are essential when moving and aligning images and text on a HTML5 canvas. If you have any sort of HTML5 content that belongs together, like a title and a paragraph, then you should probably create a group to put them in.
Scewing methods
First we will look at the scew method that uses horizontal slices. My demo has only 1 object being scewed so I have no problem using lots of slices, I have chosen to use 1 slice per vertical pixel in the original image. This way you get the maximum image quality possible, sampling something smaller than 1 pixel does not give you any more detail.
<xmp>// Scew using a horizontal pivot, see reference images at https://kalverda.com/code/javascript-scew-tutorial function scew( howmuch ) { // destroy and (when garbage collection gets round to it) free the memory of the slices from the previous scew. scewedImageGroup.destroyChildren(); // Using 1 slice per row of pixels on the screen. // Assuming the group is not scaled, 1 pixel per slice is the maximum detail. // To improve speed at the cost of the 'edge smoothness' use less slices var slices = stretchToHeight; var sliceheight = stretchToHeight / slices; var sampleheight = currentImage.height / slices; var direction = howmuch > 0; if( direction == false ) { // Only scew by a positive amount or the image will be mirrored. howmuch = Math.abs( howmuch ); } for( var i = 0; i < slices; ++i ) { var sampleFromPosition = i; if( direction == false ) { // The slice we start with will be the biggest. // So to flip the direction we start at the end and go backwards. sampleFromPosition = slices - i; } // create a new image with nothing in it. var aSlice = new Kinetic.Image(); scewedImageGroup.add( aSlice ); // calculate where this slice goes relative to the 0,0 point of the group. var widthdecrease = (sampleFromPosition / 2) * howmuch; var indent = (sliceheight * howmuch) * i; aSlice.setWidth( stretchToWidth - widthdecrease ); aSlice.setHeight( sliceheight * 1.2 ); aSlice.setX( widthdecrease * 0.5 ); aSlice.setY( (sliceheight * i) - indent ); // Sample from the original image at the correct position. var sampleFromExact = sampleheight * i; if( direction == false ) { sampleFromExact = currentImage.height - (sampleFromPosition * sampleheight); } aSlice.setCrop( 0, sampleFromExact, currentImage.width, sampleheight * 1.2 ); aSlice.setImage(currentImage); } };</xmp> |
It is for loop that starts with a normal size slice and then makes each slice slightly smaller based on a ‘howmuch’ variable. It places each slice so that the vertical middle of the image remains in the middle and shortens the height of the image by multiplying the height by the ‘howmuch’ variable.
Scewing with vertical slices is very similar, but the indent is now along the X axis and instead of a with decrease you have a height decrease per slice.
<xmp>// Scew using a vertical pivot, see reference images at https://kalverda.com/code/javascript-scew-tutorial, but tilt your head 90 degrees. function scewSideways( howmuch ) { // destroy and (when garbage collection gets round to it) free the memory of the slices from the previous scew. scewedImageGroup.destroyChildren(); // Using 1 slice per row of pixels on the screen. // Assuming the group is not scaled, 1 pixel per slice is the maximum detail. // To improve speed at the cost of the 'edge smoothness' use less slices var slices = stretchToWidth; var sliceWidth = stretchToWidth / slices; var sampleWidth = currentImage.width / slices; var direction = howmuch > 0; if( direction == false ) { // Only scew by a positive amount or the image will be mirrored. howmuch = Math.abs( howmuch ); } for( var i = 0; i < slices; ++i ) { var sampleFromPosition = i; if( direction == false ) { // The slice we start with will be the biggest. // So to flip the direction we start at the end and go backwards. sampleFromPosition = slices - i; } // create a new image with nothing in it. var aSlice = new Kinetic.Image(); scewedImageGroup.add( aSlice ); // calculate where this slice goes relative to the 0,0 point of the group. var heightscew = (sampleFromPosition / 2) * howmuch; var indent = (sliceWidth * howmuch) * i; aSlice.setWidth( sliceWidth * 1.1 ); aSlice.setHeight( stretchToHeight - heightscew ); aSlice.setX( (sliceWidth * i) - indent ); aSlice.setY( heightscew * 0.5 ); // Sample from the original image at the correct position. var sampleFromExact = sampleWidth * i; if( direction == false ) { sampleFromExact = currentImage.width - (sampleFromPosition * sampleWidth); } aSlice.setCrop( sampleFromExact, 0, sampleWidth * 1.1, currentImage.height ); aSlice.setImage( currentImage ); } };</xmp> |
And lastly this is an animation to preform multiple scew events in sequence, causing an image to flip and be swapped out for another image.
<xmp>// Animated Flip, this scews the image in multiple steps up to 1. // Then it swaps out the image and does the same in reverse. var flipAmmount = 0; var animationHalfWayDuration = 500; // 500 × a 1000th of a second = half a second = 1 second for the full animation. var flipAnimation = new Kinetic.Animation( function( frame ) { flipAmmount += frame.timeDiff; var flipDoneScale = flipAmmount / animationHalfWayDuration; if( flipDoneScale > 1 && flipDoneScale < 2 ) { // animation is past the first half, but not yet at the end. currentImage = imageTo; // The flip ammount is going from 1 to 2, // and needs to be converted to go from -1 to 0 // for the second half of the animation. flipDoneScale = -(1 - (flipDoneScale - 1)); } // the - is here to decide the direction of the flip scew(-flipDoneScale); // or scewSideways(-flipDoneScale); if( flipDoneScale >= 2 ) { // End the animation at 0 scew, scew( 0 ); // when the animation is finished, stop looping and reset. flipAnimation.stop(); flipDoneScale = 0; flipAmmount = 0; } // Queue up a redraw to display the changes made during this frame of the animation. layer.batchDraw(); } );</xmp> |
Using the scripts
To use the scripts you need to implement them into a webpage.
Earlier we initialized a HTML5 Canvas with the code:
var stage = new Kinetic.Stage( { container: 'container', width: 400, height: 300 }); |
This contains a reference to ‘container’ which is the div where the canvas is intended to go.
So in the HTML of the website we will need to create this div.
<div id="container"></div> |
you could of course change the id to something other than container, so long as you change it in both the HTML and the Javascript.
To start scewing your images all you need to do is add a bit of more Javascript to load some images and call the scew method.
imageFrom.src = "https://www.yourwebsite.com/yourimageofchoice.png"; imageTo.src = "https://www.yourwebsite.com/yourimageofchoice.png"; imageFrom.onload = function() // you could call scew() on an image that is not loaded yet, but nothing would show up. { currentImage = imageFrom; scew( 0.5 ); // or any other number between -1 and 1. layer.batchDraw(); }; |
Downloads
Demo Webpage and Library
JS Scew Tutorial.html
JSScewDemo.rar
Willem